
How can you give your chickens reliable access to grass, avoiding barren yards? There are different ways of doing this, and each method is associated with different chicken coop designs.
Contents
- Background
- Design Considerations for Range Operations
- Daily-move Pens
- Machine-Portable Housing
- Fixed Housing
- Feed Shelters
- Stocking Density Inside the House
- More Information
My wife, Karen, and I have been raising free-range hens in Oregon since 1996 and pastured broilers since 1998. We have 700 hens and will raise over 1,500 broilers this year. We have tried many different techniques, and I hope this will allow me to speak clearly about the key points and trade-offs in each of the major range management styles.
I discuss a variety of housing types in this document. I’ve necessarily placed an emphasis on the ones I have used myself, since I have a better understanding of these. The detail or sketchiness of different sections will generally correspond to the amount of hands-on experience I have with a particular style and shouldn’t be interpreted as a value judgment.
Background
Historically, free range in poultry meant that the chickens were either totally unfenced or were kept in a field so large that the fences had little effect on their movement. This was in contrast to yarding, which uses fences to confine the chickens to a smaller area than they would normally use, or confinement, which denies them any access to the outdoors. More recently, the term “free range” has been stretched and overused so much that its meaning is almost lost. The new term pastured poultry was introduced by Joel Salatin to distinguish birds in pens moved daily to forage on growing plants, as opposed to being kept in confinement or on “mud-yard free-range.”
Until sometime in the 1950s, most chickens in the U.S. were raised on a grass range in the spring and summer, usually in portable range shelters that were moved with a tractor from time to time. The cockerels (young male chickens) were sold as broilers, and the pullets (young females) were kept for egg production. In parts of the country with a mild climate, such as the Pacific Coast, the pullets might be kept on range all winter. In harsher climates they were moved into permanent laying houses in the late fall.
Range provided the growing chickens with plenty of room. Sunshine and green plants gave them high levels of vitamins. The dispersed nature of free-range flocks minimized disease, parasites, and crowding-related behavioral problems, none of which could be treated effectively at the time. The chicken manure was applied directly to the pasture, orchard, or cropland on which the chickens were housed. The chickens provided some of their own feed by foraging.
Design Considerations for Range Operations
High winds. Portable houses are subject to blowing over in high winds, sometimes with disastrous results to both chickens and houses. It is difficult to over-emphasize the importance of a wind-proof housing design. I know a farmer with more than a thousand free-range hens who gave up the business after his houses all blew away in a sudden windstorm.
Some housing designs are much more windproof than others, for no readily apparent reason, though lower, heavier houses will generally be more windproof than taller, lighter houses. If possible, always choose a design that someone else has tested for at least a year in exposed locations.
Staking down the houses works quite well, but this is tedious in houses that are moved frequently. Staking down just one corner of the house has worked well for me.
Impact on production. Chickens on range are exposed to more weather than those in controlled-environment housing. This exposure generally reduces performance, and in extreme weather it can put the chickens’ lives at risk. Chickens perform best when kept at a relatively constant temperature; however, this is difficult with an outdoor lifestyle.
Heat and cold. Birds on range are subject to both heat and cold. After the brooding period, heat is far more dangerous than cold, unless the birds are both cold and wet. Chickens do not like to leave the shade during hot weather, and if waterers are not provided in the shady areas, the problems of heat stress will be increased.
Mature chickens are very resistant to low temperatures, but production will suffer, especially if their drinking water freezes or if they do not have a wind-proof area in which to sleep.
Predator risk. Predators have more opportunity to attack chickens on range than in confinement. Protection from both daytime and nighttime predators is essential. Predator risk is strongly affected by the design of the house and how it is used.
Turf destruction and parasite build-up. Chickens quickly destroy the turf adjacent to their houses, and over time this will extend for some distance in all directions, leading to a yard that is alternately muddy and dusty. The concentration of manure in this area also leads to a build-up of manure-borne pathogens such as coccidiosis and roundworms.
The method chosen to deal with this problem has a profound effect on housing design. With portable houses, the chickens are moved to a new spot before the damage becomes too great. With fixed houses, a design that allows multiple yards to be used alternately will make it possible for the turf to recover in the idle yards.
Daily-Move Pens
The daily-move pen was developed by Joel Salatin and popularized in his book, Pastured Poultry Profits. This technique is best suited to raising broilers and is not very satisfactory for hens. Floorless pens allow the broilers inside to graze the grass under their feet. The pens are dragged by hand to a new patch of grass once or twice a day. This leaves their manure behind and presents them with a new patch of grass to graze. Daily moves also eliminate the danger of coccidiosis and other diseases. Daily-move pens have a dramatic and almost immediate effect on plant growth, because the single day’s worth of manure provides the plants with plenty of fertilizer, while a single day’s grazing is not enough to harm the plants. Because broiler chickens do not fly well, a pen low enough for the caretaker to step into is tall enough to contain the broilers.
Broiler chickens are placed on pasture as early as two weeks of age (young enough that they literally don’t know enough to come in out of the rain), and they are slaughtered at 6-10 weeks. Chickens are not fast learners. The pasture pen provides them with a consistent environment and does not require that they learn new behaviors as they grow. Similarly, the grower is provided with a simple set of chores that does not vary from day to day. Because of this, the system of daily-move pens is probably the easiest for the newcomer to master.
The system uses a floorless pen without litter or perches. This leaves the chickens vulnerable to chilling if there is any surface runoff during rains, which limits the seasons and places in which this technique can be used.
Most growers use daily-move pens only during the warm season, but I have raised broilers in them in January, and we have twice over-wintered breeding flocks of turkeys in daily-move pens, without significant problems. Our winters are mild but very wet (average January temperatures are 39°F; average January rainfall is 12 inches).
The difficulties people encounter with this method of broiler rearing center largely around house design and are discussed below.
Goals of Daily-Move Pen Design
A pen should:
- Be easy to move by hand.
- Not injure chickens during moves.
- Remain in place during high winds.
- Be easy to build out of readily available materials.
- Have a low initial cost so the investment can be recovered quickly.
- Have a low maintenance cost.
- Provide reliable shelter from wind, rain, heat, cold, and predators.
- Allow daily chores to be performed quickly, efficiently, and safely.
- Provide easy access for the farmer, with either a roof high enough to stand under or walls low enough to step over.
- Support the changing needs of the chickens as they grow.
Examples of Pasture Pens
Salatin Pasture Pen with Wood Frame, Aluminum Roof and Walls
Salatin’s pens are typically 10×12 feet across and two feet high. The frame is made of 1×3 inch boards, with extensive diagonal bracing. All four walls of the frame sit flat on the ground. The roof is flat. Three-quarters of the roof and half of the wall area are covered with aluminum roofing; the rest is covered with chicken wire. The pen weighs about 200 pounds and is windproof. It has an estimated cost of $150-$200 and can be assembled with ordinary carpenter’s tools.

Access is from the top. The back half of the roof is permanently attached, but two lift-off hatches cover the front half. One hatch is covered with aluminum sheeting, while the other is covered with chicken wire for extra ventilation in hot weather. Daily servicing of feed and water can be done by reaching into the pen, without climbing in. Broilers will not fly out of such a pen, but standard-breed chickens and turkeys will when the hatch is open.
The pen is normally equipped with one bell waterer and one 4–5-foot feed trough, and stocked with 90 broilers. The trough feeder can be set on the ground or suspended from the roof. The pen is so low that it is difficult to use hanging tube feeders effectively.
To move the pen, Salatin places a custom-built dolly, which resembles a hand truck, under the back end of the pen, raising it up a few inches into the air. He then walks around the front of the pen, drags it forward until the entire pen is on clean grass, and removes the dolly. Attempting to move the pen without a dolly can break both your back and the pen, since the rear wall will snag on every obstruction. Also, slow-moving broilers are sometimes run over by the rear wall of the pen; without the dolly they can be bruised or killed. If the rear wall is raised up by the dolly, such broilers will pop out unharmed to the outside, where they can be caught and returned to the pen.

Notes:
- Salatin’s pen design has been used successfully by a great many people. One can hardly go wrong by copying it exactly.
- The dolly is part of the design: the pens are much too hard to move without it.
- When one cannot resist the impulse to modify the design, the most common mistake is to make a pen that is too heavy.
- Perhaps the second most common mistake is to make a design that is not windproof. Salatin’s low, flat-roofed outline is extremely wind-resistant. The two roof hatches will fly off in high winds if not strapped down, but the house itself stays put. Gable roofs and round roofs are much more subject to blow-over, and shed roofs are worst of all.
- The safest way to modify the design includes reducing its size, since a smaller pen will be stronger, lighter, and easier to move than a larger one built in the same way. This gives you a margin of error. A pen eight feet square can accommodate roughly 50 broilers, which is a good batch size for many people.
- It is easier to move the pen without running over broilers if you can see all the way to the back wall, so you can stop before running over a slow-moving broiler.
Pasture Pen with Wood Frame, Steel Roof, Tarp Walls
This is a greatly simplified version of a Salatin pen. One reason I could simplify it is that I made is smaller, only 8 feet square, which automatically makes it sturdier than Salatin’s much larger pens. Instead of using a dolly to move the pen, I built it on skids to make it easy to move. Unlike every other pasture pen design I’ve ever seen, a child can pull this one—with one hand.
I built the pen shown below in 1999 and later modified it, adding insulation and flaps between the skids. It is 8 feet square and holds about 50 broilers. It costs under $100 and can be built in less than a day with ordinary carpenter’s tools. It’s a very simple house that anyone who can drive a nail two times out of three can build without difficulty.

This house is framed out of 1×4 and 2×3 lumber, banged together with nails that are clinched over on the inside. Galvanized steel roofing is used on the permanently attached back half of the roof. Steel roofing is much stiffer than aluminum, and the roof adds a great deal of stiffness to the pen as a whole. This allowed me to eliminate all 12 of the diagonal braces in Salatin’s design.

Two walls go all the way to the ground, forming skids, while the other two walls are built above the skids, 3 inches in the air. This prevents the back wall from dragging on the ground, making the pen very easy to move. To prevent the broilers from escaping from under the walls, and to keep predators out, flaps of black rubber carpet protector were stapled along the full width of the two elevated walls.
The removable half of the roof is a light frame of 2×2 lumber covered with chicken wire, which in turn is covered with aluminized bubble insulation (sold under trade names such as Tekfoil and Astrofoil). In the warm season, when we rarely have wind, this panel is simply placed on top of the pen. In the cool season, it is held down with bungee cords. The front roof panel will blow off if not tied down, but otherwise the design is completely windproof.
Salatin’s pen has several features designed for his hot-summer climate. This includes the open section in the roof and the use of reflective aluminum roofing on the walls. Our farm is in the Coast Range of Western Oregon, which has cool summers, with an average temperature in July and August of only 69°F. For our climate, the roof does not need to be vented, and walls of colored tarps over chicken wire can be used without introducing disastrous amounts of heat gain.
In a hotter climate, reflective silver tarps or sheet metal would make a more appropriate wall. Reducing the area covered by tarps to expose more chicken wire will also be helpful, provided that the chickens always have adequate shade. A vent along the rear wall, just under the roof, would also help in hot weather. A hinged board could be used as a cover, which would be opened in the morning and closed in the evening.
Keep it simple
When I move a pen like this, I just grab the rope at the front of the pen and move it. That’s it. A lot of people make everything unnecessarily complicated, and think nothing of having to set and remove a dolly and mess around with the feeders and waterers as part of the process, as shown in the video below. This is unnecessary!
Insulation and Pasture Pens
The front roof panel is covered with chicken wire with aluminized bubble insulation on top. The rear roof panel is steel roofing with aluminized bubble insulation underneath. I am considering replacing the tarps on the walls with aluminized bubble insulation as well.
I believe that insulation is the wave of the future in pasture pen design, because it is one of the few features that can help the chickens in both hot and cold weather. Insulation also reduces condensation on the roof and walls, which keeps the pen drier. Insulation has been a standard feature in commercial chicken houses since the 1930s, and in range housing in Europe, but not in American range housing.
Aluminized bubble insulation is inexpensive, lightweight, waterproof, and rot-proof, and helps prevent temperature extremes inside the house. It is normally installed with a staple gun and can be cut with scissors. I consider it to be “the duct tape of insulation”—not necessarily the best insulation for a given job, but almost always the most convenient. I have not used it long enough to know how many years it holds up in sunlight, but the outer aluminum layer ought to protect the plastic underneath.
Styrofoam panels are another possibility for roof insulation, though for some reason chickens love styrofoam and will eat it if they can reach it.
Notes on this simple skid-mounted pen:
- Don’t bother with hinges on the removable roof section. Better to have it fly all the way off than have it twist off its hinges when you forget to fasten it down. Just strap it down with bungee cords.
- Salatin says that pens with skids are less predator-proof than ones with all four walls on the ground, and this was our experience, too, before I covered the gaps between the skids with rubber carpet protector. But I don’t have enough of a track record with this modification to know whether it’s as good as a flat-on-the-ground pen.
- The front of the pen is 1-inch chicken wire. We have had trouble with raccoons reaching through the wire and grabbing chickens. If I were building this pen again, I would use ¼-inch or ½-inch hardware cloth instead.
- If I were building a similar pen today, I would use sheet metal instead of tarps on three of the walls, and use ½-inch hardware cloth on the front. This would be more permanent and predator-proof, and the pen would still be easy to move with the extra weight. Also, it takes less time to nail on a sheet of metal siding than to install chicken wire followed by a tarp.
- I think these pens deserve more popularity than they’ve received so far.
Pasture Pen with Lightweight Cattle Panel Frame, Tarp Walls
My wife Karen developed these pens after seeing shelters that local farmers had erected for their sheep and llamas. These used lightweight cattle panels bent into hoops and covered with tarps. Karen added a wooden frame underneath, to make the structure portable, and front and back walls. The pen is roughly 8 feet feet square and costs under $100 to build with ordinary carpenter’s tools.

Karen’s idea was to make a walk-in pen, which is more convenient to the farmer than a step-in pen. It is also simple, inexpensive, easy to build, and very pleasant to service. Low pens involve some bending and lifting to remove, fill, and replace feed troughs. Taller pens can accomodate hanging tube feeders, which do not need to be removed when the pen is moved. All the equipment is accessible, and the chickens are more visible than in low-roofed houses. These hoophouse pens have never shown any sign of blowing over or shifting position during three years of use in exposed locations. (We have no idea why our hoophouses don’t blow over and other, more conventional hoophouses do.)
Lots of people have jumped on the hoophouse bandwagon. Here’s a typical example:
Lightweight cattle panels are 52 inches wide and 16 feet long. A two-panel house is 8 feet 8 inches long and between 7 and 9 feet wide (a three-panel house would be 13 feet long). The height of the hoop itself is a couple inches less than 6 feet if the house is 8 feet wide. The skids add another two inches of height. A two-panel house, 8 feet wide, has 69 square feet of floor area, about the same as my 8×8 pasture pen, and about half the size of Salatin’s pens. A three-panel house would have 104 square feet.
The wooden bottom frame is made from 2×4 lumber, with two skids and two sills. The sills are notched and attached to the skids with lag bolts. Notching the sills reduces the gap under the front and back walls to about 1 ½ inches, which is effective in preventing chicks from escaping and raccoons from entering. However, a smaller gap means that the house will snag on smaller obstructions.
The front and back are framed from 1×4 lumber or sections of lightweight cattle panels cut into shape with bolt cutters and lashed in place with wire. The back is covered with a tarp. In summer, an open area is left between the back wall and the roof to provide additional ventilation. The front is covered with 1-inch chicken wire, and has a doorway placed in the middle to allow access. Hinged doors have proved difficult, since the house warps when moved and the doors tend to bind. Lift-out hatches have been more trouble-free.
The house is covered with plastic tarps. Silver tarps are better than the cheaper kinds. Multiple layers of tarp are probably a good idea, especially at the top. It is difficult to achieve a tidy-looking installation with standard-sized tarps, but the houses are extremely comfortable for both the farmer and the chickens.
Karen has also used these houses for turkey flocks, suspending 2×4 roosts from the roof of the house. The only difficulty has been that, once turkeys approach sexual maturity, the toms will attempt to break out to attack the toms in adjacent pens, and they will eventually make holes in the tarps and even in chicken wire. They can be held in with heavy-duty 1-inch chicken wire if it is attached very securely with a combination of poultry staples and wire or tie wraps. We have found 2-inch chicken wire to be entirely inadequate.
Best practices for cattle-panel hoophouses:
- Use a ridgepole straight down the middle, under the hoop. Otherwise, it will collapse under snow loads and sag from the weight of hanging feeders.
- If the front and back sills are flat on the ground, the house is impossible to move. Leave a gap of at least a couple of inches, and use my rubber-flap trick (described in the previous section) to keep chickens from getting out and predators from getting in.
- Keep it light. Some people build the framing or nest boxes like a bomb shelter. Don’t do that, or you’ll never be able to move the house.
- Raccoons can reach through chicken wire and kill your chickens. Use ½-inch hardware cloth for the bottom 18 inches or so, and chicken wire above that. Put the tarps over the chicken wire. You can attach the chicken wire and hardware cloth to the cattle panels with zip ties, but along the wooden frame you’re better off holding it down with battens.

Pasture Pen with PVC Pipe Frame, Tarp Roof/Walls
Many people build houses from PVC pipe, which is inexpensive, lightweight, and easy to work with. It is cut to length and held together with PVC fittings and pipe glue. Chicken wire can be attached with tie wraps. I have had good luck attaching tarps to PVC pipe with a staple gun.

Karen’s first stand-up pasture pen was a 10×12 foot PVC house. It was light and airy, comfortable for the birds, and extremely easy to move. It was very inexpensive to build, since we got the pipe for free, and cost around $50.
However, it blew away in moderate winds, and the pipe joints broke constantly. The weight of a bell waterer was enough to cause the structure to sag. The pen was quickly rendered useless by repeated damage caused by moderate winds. Had we built the pen lower, it would have blown around less, but it would still have been unacceptably weak for use in our exposed location.
Some growers have reported excellent results with PVC pens, while others have reported experiences similar to ours. Filling the pipes with water makes the pens more windproof, but also makes them harder to move and doesn’t make them any stronger.
I would recommend that you not be the first person on your block to test a PVC design, but if you find a proven model that holds up under similar conditions to yours, by all means use it—but copy it exactly. If you do experiment with PVC pens, handle them gently and stake them down each time you move them.

Machine-Portable Range Houses
Houses designed to be moved with a tractor or four-wheel-drive vehicle can be made larger, stronger, heavier, more durable, and with more interior features than a hand-movable pen.
A machine-portable house is basically a chicken coop on skids. The methods of construction vary. Some people build greenhouses on skids. Some build tents on skids. I build sheds on skids, with wooden frames, plywood sides, and metal roofs.
It is possible to put houses on wheels rather than skids, but this complicates the design if you don’t have a suitable trailer or wagon already. A wheeled house can roll downhill when you don’t want it to, while a house on skids stays where you put it. Any tractor can pull quite a large skid-mounted house. Dragging a skid-mounted house across a pasture doesn’t damage the turf.
The Salatin method of pasture pen confinement does not work well with machine-portable housing. Moving a floorless pen with the birds inside must be done carefully and gently, which is hard to do with a tractor. Because of this, machine-portable housing inevitably involves a management system that gives the birds access to the outdoors. If the house is floorless, the birds must be shooed outside before the house can be moved safely. If it has a floor, the house can be moved with the birds inside, but the presence of the floor means that their only access to forage is outdoors. Either way, outdoor access becomes necessary.
Once the chickens have access to the outdoors, the advantage of the daily move is reduced, since the chickens do not run out of forage so quickly. I have heard of machine-portable houses being moved anywhere from once every three days to once a year, depending on how fast the chickens destroy the nearby turf and how much turf destruction you are willing to put up with.
Large flocks can be kept with machine-portable housing. Joel Salatin keeps a flock of 1,000 hens in a single large hoophouse, which he moves every three days. I keep 700 hens in 14 small colony houses, which I move every 1-3 months.
To give the chickens outdoor access, the house needs pop-holes (chicken-sized doorways)—in general, the more, the better. If the pop-holes are too narrow or too few in number, chickens who want to go in and out will be blocked by others lounging around in the doorway. Also, high-traffic areas lead to unnecessary mud and manure build-up. My machine-portable houses are open for at least half their full width—4 feet of doorway for 50 chickens. Even so, you can sometimes see the entire doorway blocked by a crowd of inconsiderate chickens, with a group of frustrated birds pacing back and forth looking for a way through.
Benefits of Machine-Portable Chicken Coops
Compared to hand-movable houses, machine-portable chicken coops, if well-constructed, can be:
- Sturdier, surviving stronger winds, heavier snow loads, and more vigorous towing.
- More weatherproof, making them suitable for year-round production, including winter brooding.
- Longer-lived, by being built with the same materials and techniques used in permanent agricultural buildings.
- Larger, holding more birds and equipment, making chores easier.
- More versatile, usable as a brooder house or for hens, broilers, turkeys, or ducks-and also for non-poultry uses.
Some machine-portable housing is too specialized to yield the full range of benefits, but the possibility of a general-purpose house that lasts 20 or 30 years is worth considering.
Wheels or Skids?
I hate wheels on chicken coops. If you build your chicken coop on skids, it stays where you put it. If you put wheels on it, it rolls away—downhill or even in a stiff breeze. Even quite a small tractor (a real tractor, not a jumped-up lawn mower)) or pickup truck can move a large chicken house on skids.
Skids seem to be a lost technology.
Summer Houses vs. All-Season Chicken Coops

Summer houses are well-ventilated and may be open on more than one side. They are typically uninsulated, since a highly ventilated house will not get much hotter than the outside temperature unless its roof is very low. Chickens are much more susceptible to heat than to cold once they are past brooding age, and areas with hot summers require houses that allow plenty of shade and airflow. Producers can use summer houses for extended seasons by reducing the ventilation, usually by attaching tarps or plywood to the open walls.
All-season houses, in contrast, tend to be open on only one side, with closable vents or windows for cross-ventilation in the summer. Insulation is helpful both summer and winter. All-season houses are more commonly used as brooder houses and hen houses than as broiler houses. Chicks need more protection from the cold, and hens lay year-round, whereas most pastured broilers are raised only during the warm season.
Floored vs. Floorless Houses
The concept of a daily-move pen requires that it be floorless, to provide forage. But when outdoor access is provided, there is no need for forage inside the house. A floor can thus be added if desired. Floors have advantages and disadvantages.
Advantages of a floor:
- By adding a wooden floor to a portable house, you can move it with the chickens inside.
- A floor makes it easier to exclude burrowing predators such as rats from the house.
- By having a floor raised a few inches off the ground, you reduce the possibility of a wet floor during periods of heavy runoff.
Disadvantages of a floor:
- A floor adds to the cost of a house.
- The space between the ground and the floor is an excellent hiding place for rats (the longer the house is kept in one place, the worse this problem is likely to be).
- If you use a floor, you must also use litter, and the manure and litter must be pitched from the house by hand.
- Floors rot.
- Houses with floors are warmer in the summer and colder in winter than floorless houses.
Traditional range housing used floors in brooder houses, to isolate the chicks from wetness and rats, but used floorless houses for older birds.
The main advantages of floorless houses are low cost and the elimination of manure pitching. Instead of removing manure from the house, the house is removed from the manure. Once the house is moved, the manure can be left where it is or spread over the pasture. I use a rear scraper blade on my tractor to spread the manure. This causes very little damage to the turf.
Roosts can be used as an alternative to litter in a floorless house. By sleeping on the roosts, the birds stay clean and dry. However, broilers are usually slaughtered before they are old enough to have a fully developed roosting instinct.
In egg production, litter is useful for keeping the hens’ feet clean. Depending on your setup, this may require that you use litter on the entire floor, or just in the vicinity of the nest boxes.
Litter works perfectly well in a floorless house, as long as it doesn’t become so deep that it’s impossible to move the house without shoveling out the litter and manure first. I brooded all my chicks in floorless houses for years. I blocked the gap between the skids with boards and added about 4 inches of litter. Ironically, I never had trouble from rats until I switched to concrete-floored brooder houses.
| Floor Type | Suitable for Hens? |
Suitable for Broilers? |
Notes |
| Bare Ground, no perches | No | No | Broilers become dirty unless house is moved every day, which is a nuisance with machine-portable housing. |
| Litter Over Dirt | Yes | Yes | Litter keeps hens’ feet clean and leads to cleaner eggs. Litter keeps broilers clean. |
| Litter Over Floor | Yes | Yes | House can be moved with birds inside. Litter keeps hens’ feet clean and leads to cleaner eggs. Litter keeps broilers clean. |
| Perches Over Dirt | Yes | No | Hens want to roost. Broilers are not old enough to have developed a roosting instinct. |
| Perches Over Litter | Yes | No | Painting roosts with linseed oil or mineral oil will kill roost mites and eliminate the need for insecticides. |
| Wire | Yes | No | 1×1-inch or 1×2-inch welded wire supported at least every 24 inches is best. Not suitable for broilers (causes breast blisters). House can be moved with birds inside. Not insulated for winter. |
| Slats | Yes | No | Built from 1×2 furring strips with gaps in between for the manure to fall through. |
Frequency of Moving
Machine-portable houses are moved as often as once every three days or as rarely as once a year. Moves may be mandated by a desire to spread the chicken manure over the pasture as evenly as possible, or to cause the pasture plants to be evenly grazed. If so, the houses should be moved at least once per week. However, frequent moves will often fail to repay the extra labor they involve.
If one can tolerate a certain amount of turf destruction, the time between moves will be determined by the state of the inside of the chicken house or the state of the range.
The house must be moved if the manure inside becomes too disgusting or too deep. In a floorless, litterless, roost-less house, the manure becomes disgusting in a day or two, because the chickens have to sleep in it. If you provide something to separate the birds from the manure (litter, roosts, wire, or slats), the time between moves can be greatly extended. My houses have to be moved about once every three months, which is the time it takes for the manure to build up to the height of the skids.
The amount of turf damage depends on the stocking density and the weather. I have found that using generous amounts of perimeter fencing reduces pasture damage dramatically. Last summer, I fenced 150 pullets into a quarter-acre area (giving a stocking density of 600 birds per acre), and they destroyed the pasture in a few weeks. Expanding the fencing to give a density of about 100 birds per acre caused pasture damage to cease except in areas within a few feet of houses and feeders.
House size also has an effect on the frequency of moves. Dividing the flock between several small houses, widely separated, will cause far less pasture damage than putting the flock in one big house.
Homing Instinct
Chickens return to the same place to sleep night after night. This is called a “homing instinct.” What happens if you move their house? Do they “home in” on their house, or on the spot where it stood? Free-range chickens are often not fenced tightly enough to be forced into making the right decision.
It turns out that you can move their houses a short distance without confusing them. But if you move a house too far, the chickens will sleep on the ground where the house used to be. When this happens, you will have to catch the chickens after dark and put them into the houses. And again the next night. It can take several nights before they all start sleeping in the houses again.
Here is my method of moving hen houses: When dealing with an inexperienced group of hens, I try to move their houses very short distances at first, little more than the width of the house. Scraping or shoveling the manure from the old house site, or sprinkling it with lime, will help prevent the chickens from recognizing it. After their home has been moved a couple of times, I can cover fifty feet or more per move without confusing the hens. It is best to move the house early in the day, to give them more time to get used to its new position. Moving it just before dark is a bad idea.
While this method does not allow me to make dramatic long-distance moves, it gets the hens onto clean grass, which is all I need.
I have not tried this method with broilers.
There are two alternative methods. One is to move the house with the chickens inside, and to move it a long way, so the chickens can’t find their way back to where they were yesterday. In this case, their chicken house is the only thing in the neighborhood that looks like home, so they will go inside at night without any trouble. Some producers lock the birds in temporarily. The other is to have a portable net fence that moves when the houses move, so the hens are physically prevented from going back to their previous home.
Examples of Machine-Portable Housing
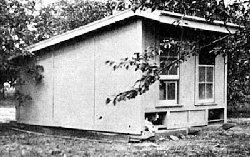
Wood Frame, Plywood Walls, Steel Roof
My henhouses are built with conventional building materials and techniques. They use 2×4 framing, waferboard or plywood walls, and galvanized steel roofs. Basically, they are lightweight wood-framed sheds on skids. They cost under $150 to build.
My most recent henhouses all have very low roofs (a little over 4 feet high) to eliminate blow-over in heavy winds. My older houses have roofs around 6 feet feet high.
I developed the low-house configuration by accident, when a storm blew two houses over, ripped their roofs off, and shattered everything above the 4-foot line. By nailing the roofs back onto the remaining structure, the low house was born. I discovered that these houses were completely windproof, were comfortable for the hens, and were not as awkward for me to work in as I had expected, so I built some more.
Taller houses work perfectly well so long as they are staked down to prevent blow-over
My houses are partway between a summer house and an all-season house. Only one side is fully open, but all four sides have gaps at the roofline, and no insulation is used. Winter egg production plummets whenever daytime highs are below freezing for several days in a row, but the health of the hens is not affected during a week of weather with highs in the teens. This house is too open for all-season use in cold climates.
The house has no doors, windows, floor, or chicken wire. The front wall is only 16 inches high, and the chickens hop to the top of this wall to go into or out of the house. Electric fence wire is attached near the bottom of the house with nail-on insulators. This prevents predators from squeezing in under the skids or climbing the front wall. The wire makes doors unnecessary for predator control.
A person working alone can easily build such a house in a day, with time for other chores. The design uses very little cutting; most materials are used full-length.
Construction. I use pressure-treated 4x4s as skids, as this is the cheapest rot-resistant wood available. Naturally rot-resistant woods such as cedar would also work. I bevel the ends with a chain saw to turn the beams into skids.
I frame and sheathe the two non-skid-side walls using 2×4 sills and 2×4 studs on 4-foot centers. (Framing with a two-foot stud spacing would give a stronger house.) For sheathing I use 3/8-inch plywood or 7/16-inchOSB (waferboard), whichever is cheaper. When a wall is finished, I raise it and place it across the two skids, and spike it into place with long nails.
The walls along the skids (the front and back walls) are formed by nailing the plywood to the skid and to the end studs of the side walls. Once the plywood is up, I attach the middle studs to the front and back walls, using right-angle nail plates instead of toenailing.
To attach the roof, I make purlins from 2x4s on edge, attaching them to the studs with 4-inch carriage bolts. There are no rafters. Lengths of galvanized steel roofing 10 feet long are screwed directly to the purlins, using roofing screws with rubber washers. Roofing screws have a much better grip than nails.
Diagonal braces are used between the skids and the sills of the other two walls. I have found 18-inch lengths of 1×4 to be adequate.
The house can be towed by running chains under the sills and attaching them to the diagonal braces, or eyebolts can be put into the skids, or holes can be bored through the skids and loops of rope attached to them. Eyebolts on the front of the skids tend to pull out, but ones on the sides will stay put.
High Houses and Low Houses. In a shed-roofed house, if the roofline is too high for its depth, it will blow over in high winds unless it is tethered. I have learned through painful experience that a house eight feet deep resists blowing over only if its maximum roof height is no more than five feet. Old-timers seem to have known this, since this ratio of 5:8 is followed in the old designs. A house ten feet deep can have a roofline of 6 ¼ feet, and one 12 feet deep can have a roofline of 7 feet.

My low houses are used as roosting houses, which contain nothing but roosts. I am gradually converting my high houses into nesting houses, which contain nothing but nests. (All feeding and watering is done outdoors.)
Separate nesting and roosting houses reduce labor, since egg collection is much faster if the nests are all in one place. It also promotes cleaner eggs, since little manure is dropped in the nesting houses, the straw litter on the floor stays clean almost indefinitely, and clean litter tends to wipe the hens’ feet as they enter. The nesting houses are kept much darker than the roosting houses, reducing problems with egg-eating.
The roosting houses are more open. Litter is not used on the floor (the hens rarely walk on the floor; they walk on the roosts). I enter the house only to see if there are any floor eggs or sick hens.
In systems using large houses, oldtimers often divided the house into three areas: the nesting room (a darkened room with nest boxes and a litter floor), the roost area (which held roosts over a droppings pit), and the feed area (feeders and waterers on a litter floor).
Wood Frame, Tarp Roof
Herman Beck-Chenoweth’s book, Free-Range Poultry Production and Marketing (3) describes basically an 8×16-foot wood-framed tent on skids, with chicken-wire walls, a wood floor, and a tarp roof. It is intended for summer broiler production. Construction plans are provided in the book.

Like most poultry producers with machine-portable pens, Beck-Chenoweth does all feeding and watering outdoors, with the feeders and waterers placed next to the house at first, then gradually shifted farther away as the broilers grow, to encourage foraging. The doors are closed at night to prevent predation. Because the house has no feed or water, it is important to open the doors first thing in the morning, because broilers do not tolerate long periods without water. (More and more growers are providing water inside the houses.)
Hoophouses
Many growers are building houses that are essentially skid-mounted hoophouses (greenhouse structures with opaque coverings). Hoophouse kits of all sizes can be ordered from catalogs and are very easy to set up. A tractor can pull quite a large skid-mounted hoophouse.

Like other lightweight structures, hoophouses can be quite susceptible to wind. The typical hoophouse is intended to be anchored securely to the ground with posts set in concrete, and putting them on skids removes this protection. Choosing a model that is relatively low and squat will help reduce its tendency to blow away, as will adding extra weight and staking the house down. As always, it is safer to copy a proven layout than to experiment on your own.
A grower not far from me with a thriving layer operation quit the business after his hoophouses blew away in a sudden windstorm. Stake ’em down!
One of Salatin’s hoophouses, his “Ewego,” which is used as a sheep shelter, is 30 feet wide and only 11 feet tall, and the ends are kept closed to within 4 feet of the ground to prevent it from blowing away.
Salatin uses a large hoophouse containing 1,000 hens with a perimeter fence that encloses only a quarter-acre, which is quite small for such a large flock. He moves the house and the fence every three days. His feeders and waterers are tethered to the house so he can move both house and equipment in a single operation.
Non-Portable (Fixed) Chicken Coops
Fixed houses can be larger than portable houses, and it is easier to supply them with utilities such as water and electricity. The house can be positioned for ease of access to roads and the farmhouse. Insulation is more common than in portable houses, extending the growing season and increasing off-season production. Controlled ventilation is practical. The use of proper foundations or pole construction will make the house windproof. Brooding is more practical because it is easy to install adequate electrical or propane gas service to the building.
Because fixed chicken housing is the norm, I will not cover housing per se here. I’ll focus on the task of attaching grass yards to fixed houses.
The difficulty of combining poultry range with fixed housing is that the yard near the house is almost inevitably over-manured and scratched to pieces, surrounding the house with a barren, muddy, polluted yard. The speed with which this happens often amazes backyarders and commercial producers alike.
It is difficult to find a successful example in this country of fixed houses combined with green range. The practice tends to be successful for a year or two, until the over-manuring starts making it hard for plants to grow.
When it works, it relies on one or both of these techniques: alternating yards and transition zones.
Alternating yards. Having two yards, but allowing the chickens access to only one of them. The other yard is limed, plowed, and replanted. When the new ground cover is fully established, the chickens are given access to it, and their previous yard is limed, plowed, and replanted in its turn.
It’s unlikely that you will be able to give the chickens continuous access to green grass this way, but they’ll have frequent access to green grass, and the plowing prevents long-term pathogen build-up and prevents the manure from becoming toxic to the plants. You can also grow crops instead of grass (or in addition to it) if you keep the chickens out until they’re too tall for the chickens to ruin.
Some people recommend having multiple yards and alternating access on a daily basis. This is fine while it lasts, but before long you’ll have to take at least one yard out of service and treat it as described above. Personally, I think that having more than two yards is a nuisance and not worth the trouble.
Transition zones (henyards). No attempt is made to keep the part of the yard closest to the house green. Instead, it is covered with a deep layer of straw, wood chips, or wood bark to prevent mud. More is added liberally if the area starts becoming muddy.
If the roof of the chicken house extends over part of the henyard, so much the better. No water from the roof should be allowed to fall onto the henyard: use gutters or have the roof slope in a different direction.
Only the area at some distance from the house is kept in grass. Chickens spend more time hanging out in the shade than out in the sun, so keep your straw yard shady and your grass yard sunny, and your grass will last that much longer. (Don’t worry: your hens will do plenty of foraging around sunrise and sunset.)
Remove the mulch near the house once a year to prevent long-term pathogen build-up and to delight a nearby gardener.
Expert tip: Design your straw yard to allow you to remove the mulch with a tractor, so if you have a roof over it, make the roof higher than your tractor’s roll bar!
Feed Shelters
Not only the chickens, but the feed requires some kind of housing to protect it from the elements.
Putting feeders and waterers into the houses with the chickens is perhaps the simplest method. This works best when the house is designed for easy access by someone with a sack of feed over his shoulder. One method for indoor feeding is to have a feed bin that holds several sacks of feed and can be filled from outside the house. This bin would have a second lid inside the house that allows access to the feed. A feed scoop would be used to fill individual feeders.
Some growers use outdoor troughs that they fill once or twice daily, always being careful not to overfeed. In this case, it hardly matters whether the feed gets rained on. Chickens like wet feed, and if there is no overfeeding, it will all be eaten long before it has a chance to go bad.
If you don’t like carrying feed to the pasture once or twice a day, range feeders become attractive. Range feeders have lids and rain shields that prevent the feed from becoming wet. The larger range feeders can be filled by someone standing on the tailgate of a pickup truck. In this case, the feed is loaded at the feed store and unloaded directly into the feeders, reducing handling to a minimum.
However, my experience is that range feeders are not a panacea. The ground around them becomes muddy, and the feeders themselves may not be 100% rainproof. Furthermore, the chickens don’t like going out into the sun when it’s hot, and don’t like going out into the rain when it’s cold. Providing shelter will make them more comfortable while eating, and this will help production.

Stocking Density Inside the House
Pastured or range broilers are usually stocked at a density of about 1½ square feet per bird for all kinds of housing. This corresponds to about 5 pounds live weight per square foot. Using this latter number allows you to calculate the amount of space needed for broilers of any size.
For hens, the density varies:
- Roosting houses (no feed or nest boxes inside): 1½ square feet per hen.
- Range houses (feed and nest boxes inside): 2 square feet per hen.
- Winter housing (where ranging is prevented much of the time): 2-3 square feet per hen if there is enough insulation and ventilation to eliminate condensation, or 4 square feet per hen otherwise.
- Modern commercial chicken houses use higher densities, but it’s hard to achieve the same densities in one of our smaller chicken house and still leave you enough room to get any work done inside.
Giving more space than the minimum amount recommended almost always makes management easier, but is less profitable because there are fewer birds.
For More Information
I recommend the following books for anyone who is serious about keeping chickens (I publish the ones from Norton Creek Press, which is my own little publishing company):
- Pastured Poultry Profits by Joel Salatin, Polyface Books. A must-have book if you’re interested in raising broilers in daily-move pens or embarking on small-scale commercial chicken butchering.
- Poultry Production: The Practice and Science of Chickens by Leslie E. Card, 9th Edition, Norton Creek Press. This is a comprehensive book on poultry farming from 1961, back when small flocks (like yours?) were still normal. This book answers innumerable questions you didn’t know you had!
- Fresh-Air Poultry Houses by Prince T. Woods, MD. A book on the benefits of simple, airy, uninsulated housing for chickens, even in cold climates. A rather quirky book from 1924, I’ve picked up a lot of great concepts from this book.
- Feeding Poultry by G. F. Heuser. An amazingly complete book on poultry nutrition, it has a lengthy chapter on range and green feeds for poultry.
- The Dollar Hen: The Classic Guide to American Free-Range Egg Farming by Milo Hastings. Now 100 years old, this book was written by Milo Hastings, who became America’s first health-food editor after his stint as a poultry scientist. Many of his observations about how other people lose money in the egg business, and how you can make money, are still true today.
The original version of this article was written for ATTRA, the National Sustainable Agriculture Information Service in 2003.
I Publish Books! Norton Creek Press
 |
 |
 |
 |
I noticed you never mentioned sand as a bedding material. I can’t imagine ever using anything else!! I scoop it out daily with a cat litter scooper and there is absolutely no smell in my coop. And I sling the scooped poop over the fence to my garden.
Just sayin…
Good point! I haven’t used sand myself. It has an interesting reputation in brooder houses, but I don’t recall ever hearing it mentioned elsewhere. I’ll add it on my list of things to check out next time I spend a day in OSU’s Valley Library.
Robert
I am going to Haiti to help with a project and part of it involves building houses for free ranging chickens. Looking for a way to gather eggs. I do not think that a movable house will work as the terrain is rough. Will free range chickens go to the coop to lay or if they are used to free range without a house will they continue to lay outside. Not sure if this site is still active?
This is the most comprehensive article on chicken housing that I’ve found. Thank you for all of the time you must have spent compiling all of this info. It has been very helpful in deciding how I will make my broiler house.
Thanks again,
Travis